Advanced Tools
Medline.com offers many tools to help you run your business as efficiently as possible. With some of these tools you can create or deactivate users for an account, set ordering rules, manage General Ledger codes and more. Most of the Advanced Tools on Medline.com need additional privileges added to your profile so please reach out to your Medline Sales Representative or contact our Helpdesk for more information.
1. Approve to Pay

- Start by clicking on “Search Invoices/Credits.”

- Enter search keyword to look for an invoice. Hover over the question mark icon for keywords available to search (optional).
- Choose a timeline from the dropdown, or click “Select Date Range” to create a custom timeline for your search.
- Select the document type you are looking for. Note that with the “Invoice” option, you will now have a drop down to be able to select an invoice by status. “Any Status” will be the default option.
- Choose your account. If many locations are available to you, click “Select” which will allow you to choose the accounts from which to pull data.

- Click on a document number to visit the interactive invoice screen.
- After executing the search, you’ll see a new “Status” column that shows you the invoice approval status. “Under Verification” means that the invoice has partially been checked in. “Approved for Payment” means that someone has created a notification that the invoice is ready to be paid.

- You can check the individual lines in to receive or check all items by checking the box under “Received” and then clicking on the “Update” button. When received, you will see who and when it was received in.
- Once the invoice is ready for payment, you can click on “Approved for Payment” – indicating that the invoice is “Approved to Pay” — which will then prompt a pop-up box to which will notify your Accounts Payable that the invoice is ready to be paid.
You will also have the option to type in a message and/or attach a copy of the invoice. Once the invoice is approved, an email will be generated to the email address you specified to pay the invoice (see below).

2. Customer Item Numbers
If you need permissions to add or maintain customer item numbers please contact your Medline account manager, or our website support desk at helpdesk@medline.com.
Once you have logged in, you have now arrived at the My Account landing page. From here, select Customer Item Numbers

- View, edit, or maintain your item records.
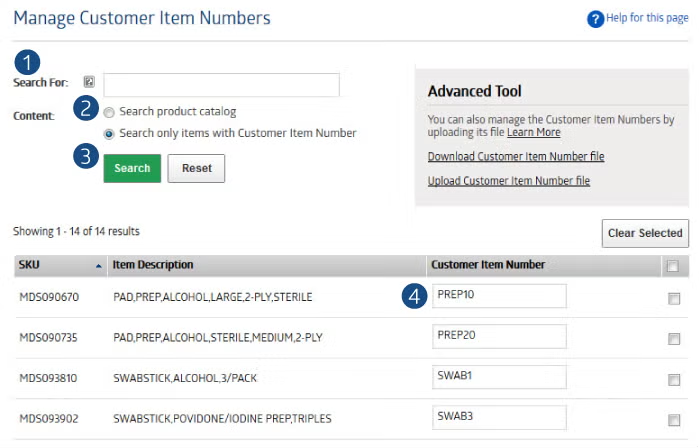
- The Search For box – if you hover over the gray question mark box, you are reminded that options for search terms include SKU, Item Description, Customer Item Number, Manufacturer Number, and GTIN. When you perform the search, be sure to consider which below radial button corresponds with your intention, as described in steps 2 and 3.*NOTE: In this box, you may enter just a partial search term and be provided with all matches that contain that partial term.
- Selecting this radial button will open your search up to any match within Medline.com, whether or not you have previously assigned a Customer Item Number to it.
- Selecting this radial button will narrow your search to only those items for which you have already assigned a Customer Item Number.
- If you have the correct permissions to maintain the Customer Item Numbers, you may add or change the entry in this field at any time, to update the Customer Item Number to SKUs individually.
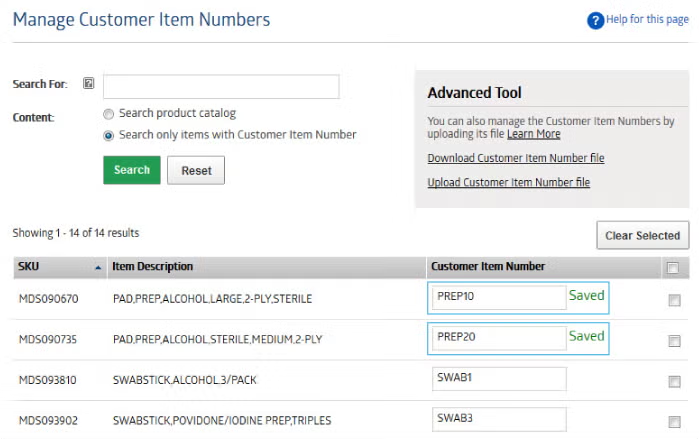
This image demonstrates the display when you enter or change a Customer Item Number for a Medline SKU. After clicking elsewhere in the page or tabbing down, this will automatically save.
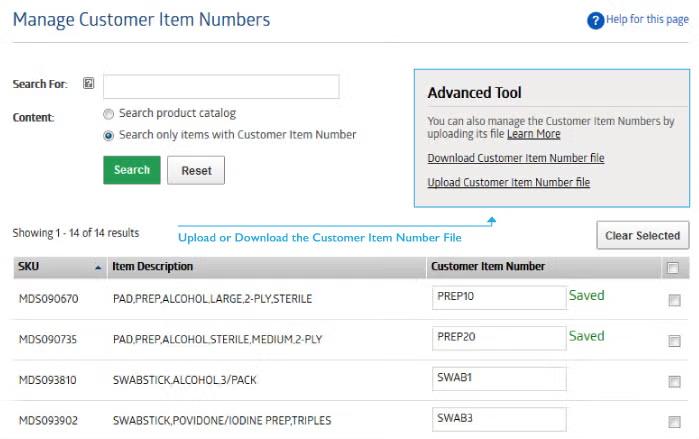
Up to this point, this tutorial has demonstrated how to manage Customer Item Numbers individually. To expedite the process when there are a large number of Medline SKUs to manage, or to download files for the item numbers you have already created, please use the Advanced Tool on the upper-right side of the page. This tool also has a “Learn More” feature that goes further in depth on these topics, as well as managing the Customer Item Number file en masse.
3. Customer Self Admin
If you would like access to this feature, please contact your sales rep. User Management and Rules Management are 2 separate features so if you would like both features added to your user profile, please request access to both.
Please note: We recommend that you limit this tool to 1 or 2 users within your organization, to minimize confusion.
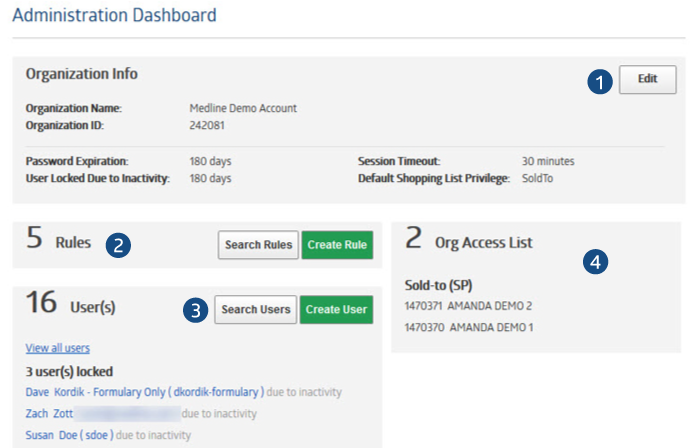
- Displays general settings for the Organization. Edit these options by clicking on the gray Edit button.
- If rules are created in the Org, search rules and see how many are in the Org. Also, you may create rules that will enable you to customize the account and put certain restrictions on orders to go to a supervisor for review and approval.
- Review how many users are in the Org along with seeing the list of all users by clicking on the View all users link. Also you are provided a quick snapshot of any users that are locked or have passwords expired. You may search and create users quickly.
- Shows all accounts and groups that are part of the Org.

- All fields that have the asterisk are required fields when creating a new user.
- Have 2 options when setting up a new user to have a system generated password created which is set by default. Also you may specify a password. Note: Passwords are just one time passwords and when a new user logs on with the password, they will be prompted to change their password.
- Choose the users business occupation/role from the dropdown.
- Choose from 5 options, hover over the gray ”?” to get a detailed explanation of each role.
- Optional: Grant access to users to use these additional tools, for more information on each tool, hover over the gray ”?” to get a detailed explanation of each Additive Role. Users may also visit the help links for Approve to Pay, Customer Item Number, GL Codes and Online Bill Pay for more information.
- Request access to Insight which is Medline’s reporting tool. By selecting this option, this does not give a user access to Insight when the username is created, rather it sends a request to Medline’s Helpdesk to add this feature to a user’s profile.
- Select specific accounts to give to users by clicking on the blue Select option. Or give users access to all accounts that are part of the Org.

- Search for users by either their first or last name. If this field is left blank when performing a search, all users will be listed dependent on the rest of the criteria selected.
- Search by a specific email address.
- Search for a specific type of user by clicking on the dropdown to make your selection.
- Search for users that have an additive role such as Insight, Approve to Pay, Customer Item Numbers, GL Codes, and Online Bill Pay.
- Search for users within the whole Organization or be able to search on selected accounts.

- Once the search has been executed and the search results have been displayed, be able to export the list of users into an excel file using this feature.
- Review all the different information per user such as the email address on file, their current status, the user’s base role, if they have any additive roles, and also what accounts they have access to.
- Click on the username to change view and/or change any of the user’s information.
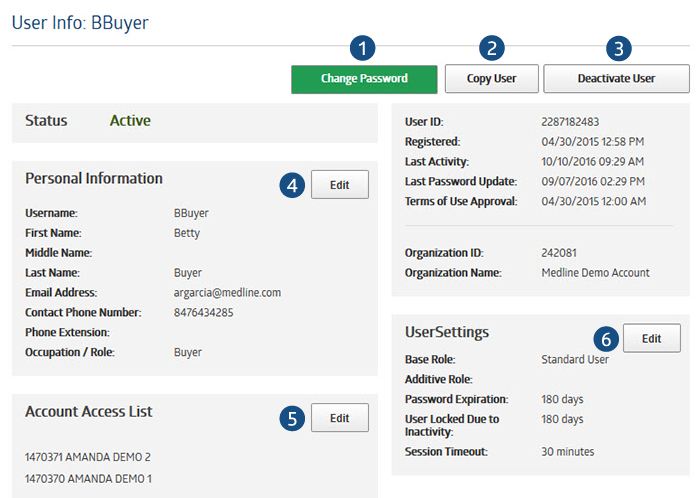
- Change a password for a user, this is beneficial if a user is locked out of their account or they have forgotten their password. Give the user a temporary password to log back into their account.
- This feature will copy a user’s base role, any additive roles that they may have, along with the accounts that they have access to.
- Deactivating a user will essentially delete their user profile. This is useful for a user that has left your company. Once the profile is deactivated, there is no way to undo the deactivation.
- Update a user’s personal information such as their name, email address, phone number, or occupation.
- Update the accounts that a user has access to.
- Update some of the advanced settings for a user; this is where you’d change a user’s base role, so for example, if you wanted to change a user from a Standard User to a Supervisor due to creating rules for the account or group, this is where the change takes place. Also give a user access to maintain Additive Roles such as Insight, GL Codes, Online Bill Pay, etc.

- Choose a rule from the list of our most common rules. If you need help creating a rule or do not see a rule you’d like to possibly put in place, contact the helpdesk for further assistance.
- The condition is only applicable to those rules that have certain criteria such as a review all orders exceeding a certain threshold.
- Uses the systems generated messaging or create your own message for the rule.
- Select specific accounts to have the rule applied to on the blue Select option. Or give users access to all accounts that are part of the Org.

- Search for rules by either Rule ID or Rule Message.
- Search for rules that are inherited by the Organization, this is set as a default. To search for rules that are not inherited, uncheck the box.
- Search for rules that are in the Organization or select individual accounts by clicking on the blue Select link.
4. Manage GL Codes
If you need permissions to add or maintain GL Codes please contact your Medline account manager, or our website support desk at helpdesk@medline.com.
- Once you have logged in, you have now arrived at the My Account landing page. From here, select “View GL/Category Code”


- Hover over the gray question mark to see what you may do a search for. Some examples include Medline SKU number, Item Description, Customer Item Number, etc.
- Differentiate which set of items you would like to search; either the entire product catalog or items that only have GL Codes assigned.
- Since GL Codes could be maintained at either individual customer or customer group level, you need to select the appropriate option. The GL codes which you are managing are for your current active account. If you have access to more than one account, select the account for which you wish to update GL Codes.
- After any changes have been made to the items, click on Update List to save changes that you have made.
- Clicking on the Edit GL Code tab allows you to add new GL Codes by clicking on the blue Add GL Code link, delete GL Codes which will then delete any items tied to that GL Code. Edit current GL Codes and Descriptions. Also be able to see how many items are tied to specific GL’s. Note that to save changes made on this page, click on Update.
- lear items that are tied to GL Codes by first checking the box to the right of the item(s) and then clicking on Clear GL Codes, once clicked the GL will be deleted from the item(s).
- Reassign items to existing GL Codes using the drop down along with being able to select the option to create a new GL Code.

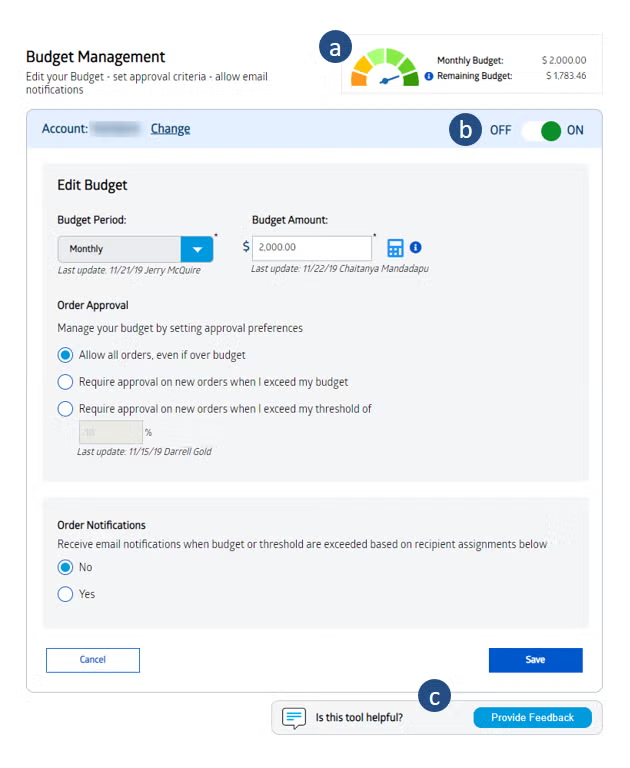
5. Budget Management
*NOTE: Some of the data displayed has been hidden for privacy purposes. You will receive all of these fields when managing your specific account.
 Once you have logged in, you have now arrived at the My Account landing page. From here, select “Administration Dashbaord” from the left navigation menu.
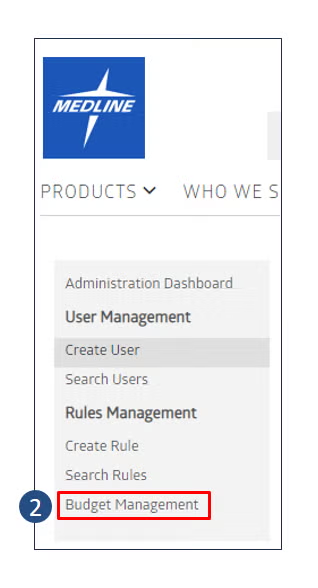
Once you arrive at the Administration Dashboard, select “Budget Management” from the left navigation menu.
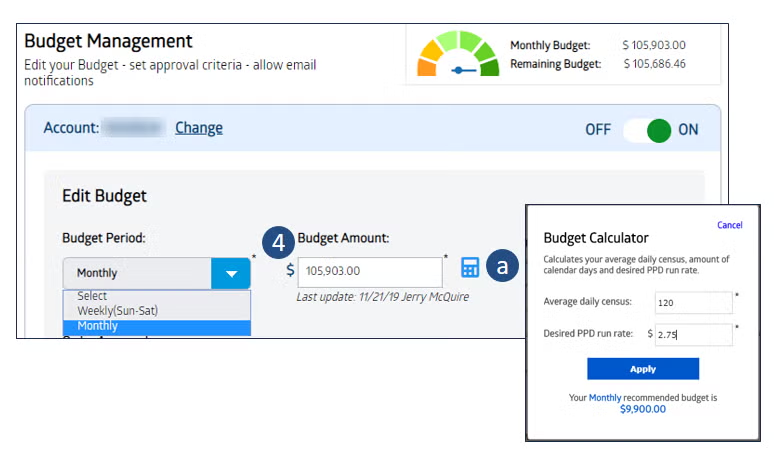
Using the drop-down menu, select Weekly or Monthly budget period.
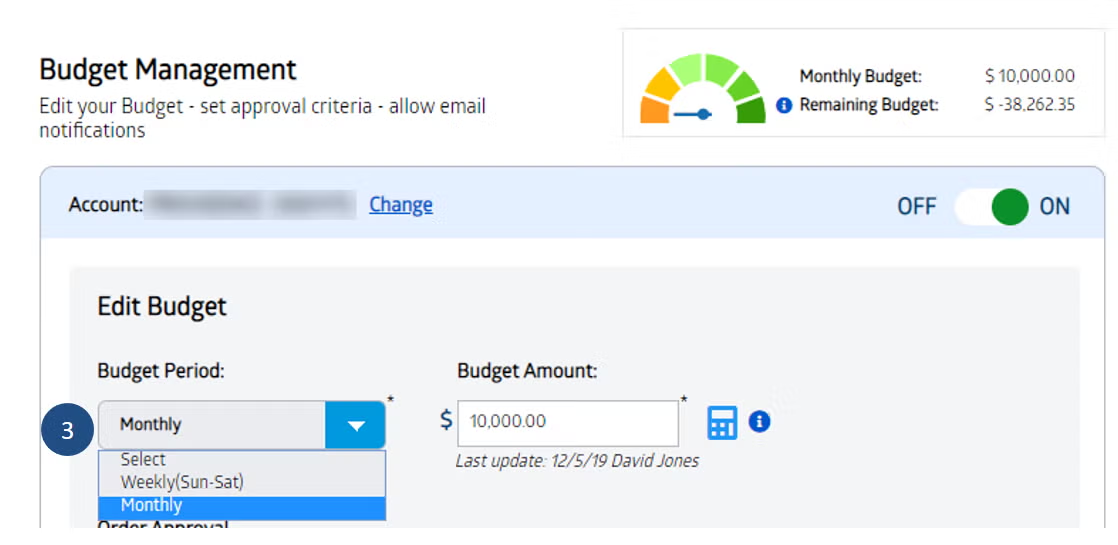
Type in the desired budget amount for selected budget period.
- Use the calculator to help determine an appropriate budget based on information specific to your facility.
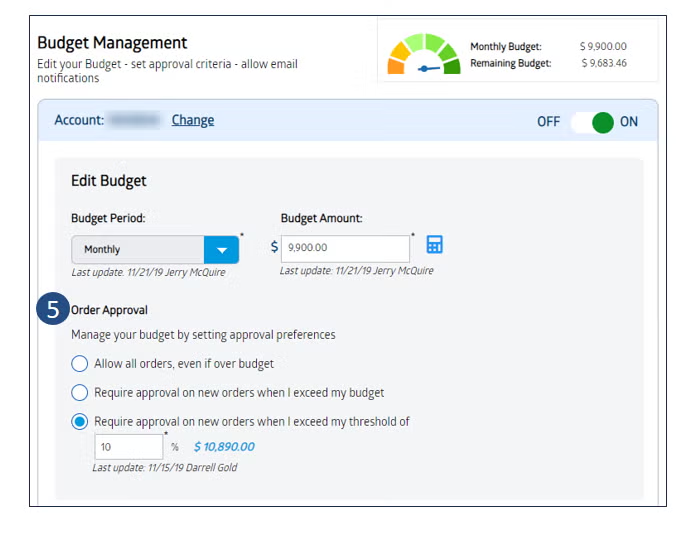
You can choose to let all orders through, require approval when defined budget is reached, or allow a threshold over budget before requiring approval.
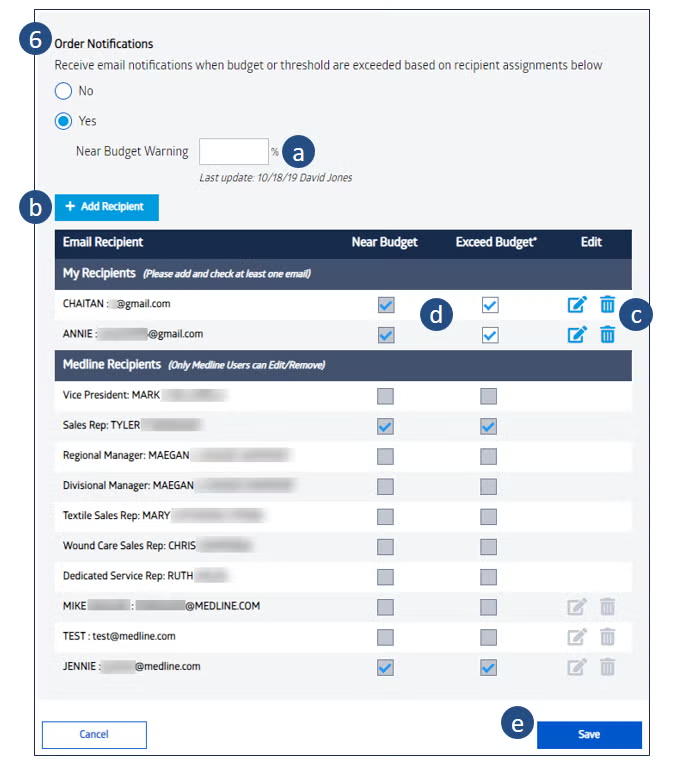
Enable and set notifications and recipients for specific spend milestones.
- Set a warning notice level when spend is approaching total budget amount.
- Easily turn Budget Tool ON and OFF to disable all features, approvals, and notifications as needed.
- Edit existing notification recipients.
- Select which recipients should receive which notifications.
- Save all inputs and edits to update the tool.
- Review infographic, which is also displayed on My Account page as well as during order creation, for real time Remaining Budget count-down.
- Easily turn Budget Tool ON and OFF to disable all features, approvals, and notifications as needed.
- Provide direct feedback; the more we know about your experience the better we can make the tool to suit your needs.