Orders
See some of the options that Medline.com has to offer when it pertains to ordering. Upload orders using our Order Upload Guide or watch a video on how to place a simple order or learn how our Approval process works when rules are set for an account.
1. Upload Orders
- By using the Upload Orders tool, you can quickly upload your shopping cart lists to Medline.com from various file types to expedite your ordering process.
Before uploading an order file, you can choose to select the hyperlinked “Order Upload Format Guide” for detailed information on the file types and formatting required for the system to be able to recognize your order details. The guide covers Excel, text delimited, and VLX file format options.
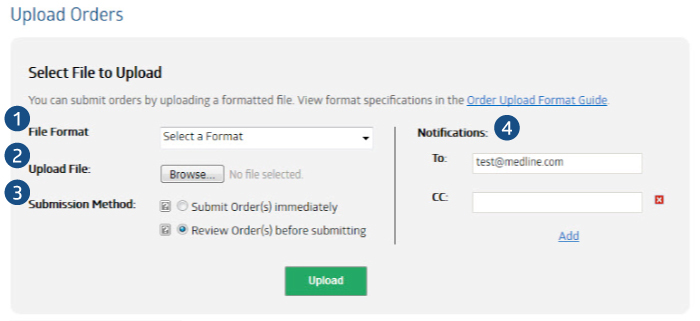
- This asks you the type of format you are attempting to upload. For more information about these formats, please refer to the “Order Upload Format Guide” discussed in the previous step.
- Select the “Browse” button next to this line to find the file you are attempting to upload from your computer.
- You can either choose to submit the order to Medline immediately, or review before submitting. If you choose to review, your file upload will display on Medline.com as a shopping cart that already has been loaded with the items and quantities you are selecting. To submit the order from this point, you would continue on as though it was a regular online order submission.
- The notifications section of this form will automatically populate with the user’s e-mail address. If any other parties should be notified, they can be CC’d on the following open text field. This is an optional step in the process.
Once selections are made, click the green “Upload” button to complete the order upload process. If you chose to review the order(s) before submitting, you will go on to submit the order as though it was from a regular Medline.com shopping cart.
When your file has been successfully processed, you will see the attached message along with receiving an email of your upload status.
![]()
2. Shopping Cart
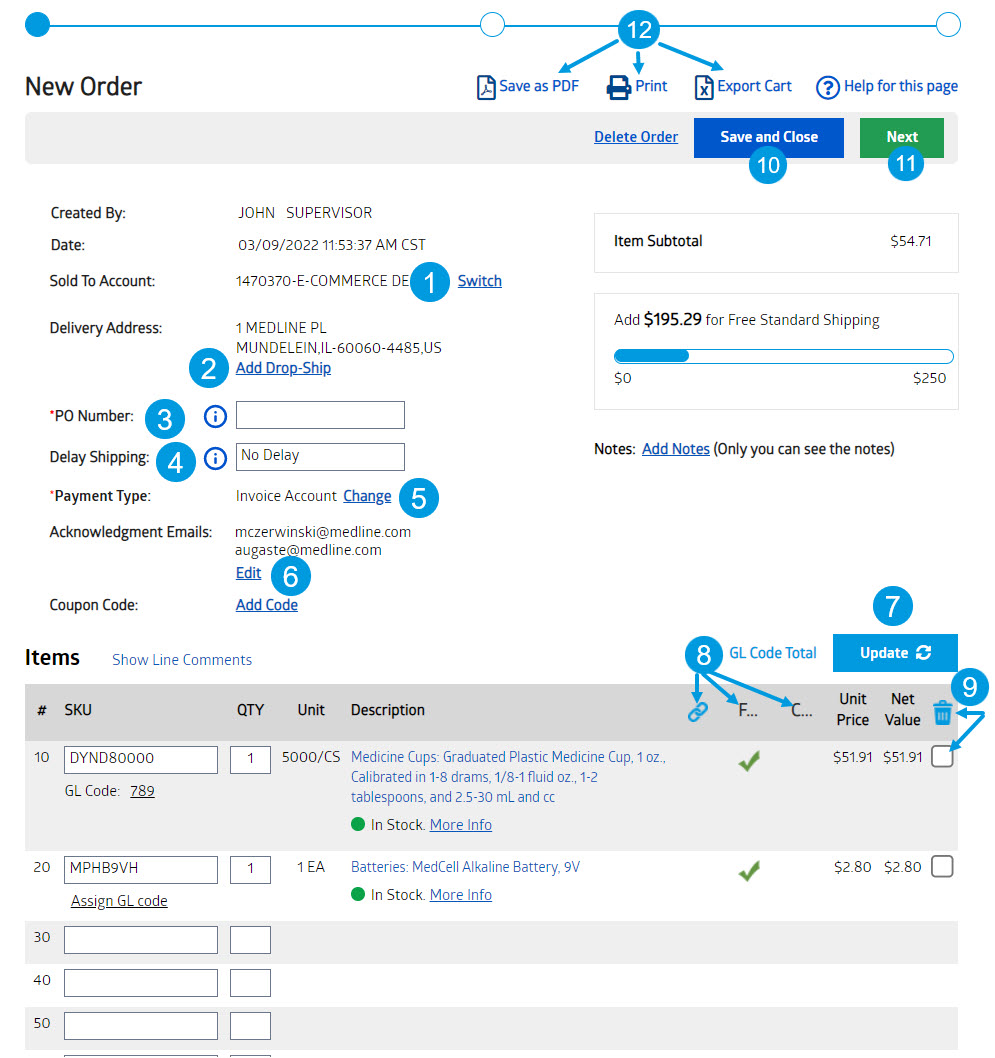
- Users that have access to purchase under multiple accounts may switch between accounts in their shopping cart. Customers may only place orders for 1 account, not multiple accounts on one order.
- Add a drop ship location to your order if applicable users.
- A Purchase Order number is a unique number assigned to an order. If you do not have or use a PO number, you may use as an example the date and your initials.
- Delay shipping allows users to set a future date for their item(s) to be shipped on.
- Choose between various payment options. A users payment options may be limited by their account settings – if you have any questions or concerns please speak with your Medline sales rep.
- 6. Users are able to add additional email addresses to receive the acknowledgement email that is sent when the order is placed.
- Change the quantities of your order before you submit to Medline, once you type in your new quantity, you may hit Enter or click on the Update button to update quantity and Net Value on the order.
- Quickly see which of your items are on contract and/or on your formulary in your shopping cart as well as seeing which items are Account Linked.
- Delete items from your cart using the trash can. First select the box to the right of the item(s) and then click on the trash can to delete that line from your order.
- Save and close lets you start an order but not submit to Medline, this order will show up under your Un-submitted Orders when clicked.
- Clicking Next will take users to the final screen to review their order, clicking on this does not submit your order to Medline just yet, this will take users to their final screen for review to which then they will be able to submit their order.
- While in the Shopping Cart, users will have the option to save the order in PDF format, Printing their order, or lastly exporting their order into an Excel document.
3. Approve Orders
4. Combine Un-Submitted Orders

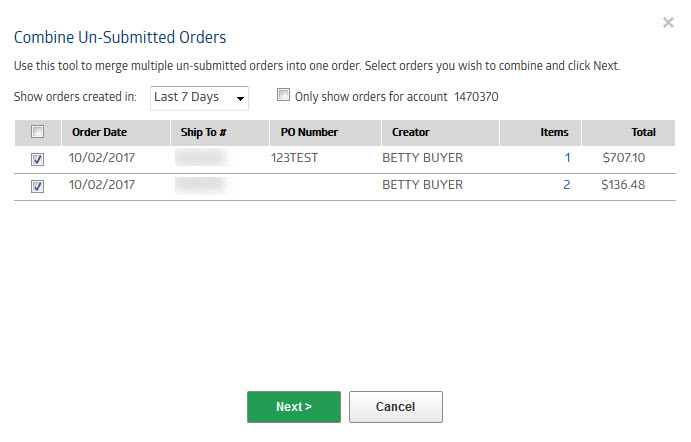
a. Select timeline from dropdown
b. Users that have access to multiple accounts will see all un-submitted orders across those accounts unless the option is selected to only see orders in current account
c. Choose which orders to combine into one larger order. You may select the orders by either clicking the box next to the individual orders or you may select the box next to Order Date which will select all orders on the page.

a. Select which un-submitted orders you want as your primary order. Primary orders will keep the same Account Header information such as main account number and PO Number if one was entered.
b. Once a primary order has been selected, click on Combine Un-Submitted Orders to fully combine all orders that were previously selected.

a. Open Order takes you directly into the shopping cart with all items now in one un-submitted order.
b. Open My Account Page takes you directly to the My Account home page.
5. Submit Orders to an Approver
6. Create Returns/Report Issues
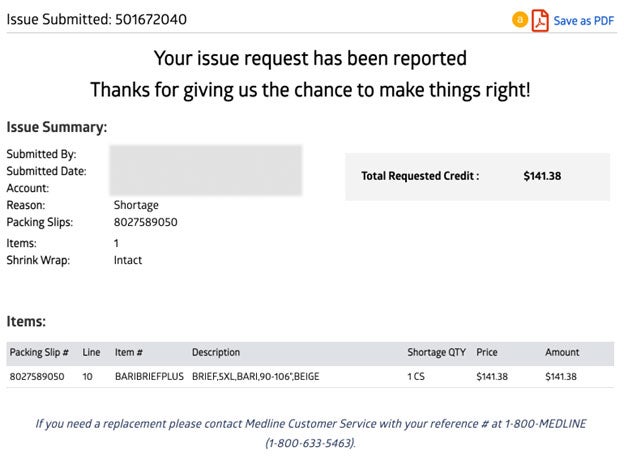
*NOTE: Some of the data displayed has been hidden for privacy purposes. You will receive all of these fields when performing your own search and return creation.
- Select “Create Return” from left nav
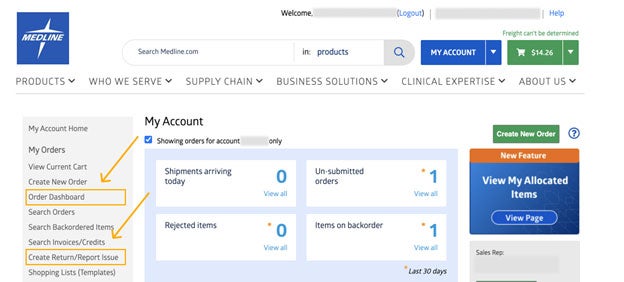
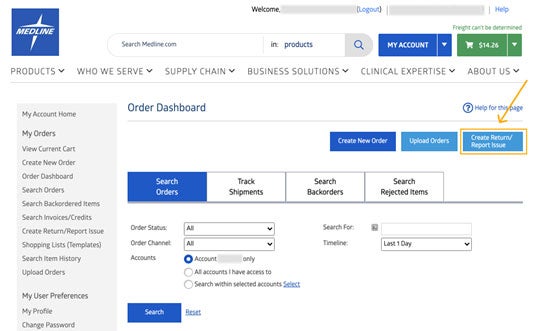
- There is a secondary way to create returns and that is through “Order Dashboard” link
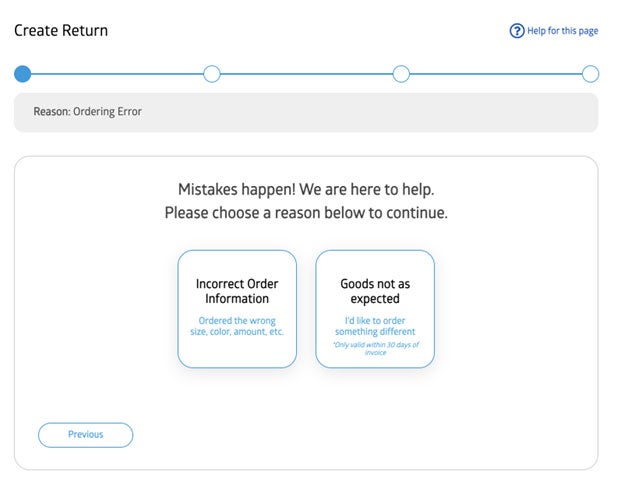
Select reason for return
- Feeding pumps to go a specific form outside of wizard
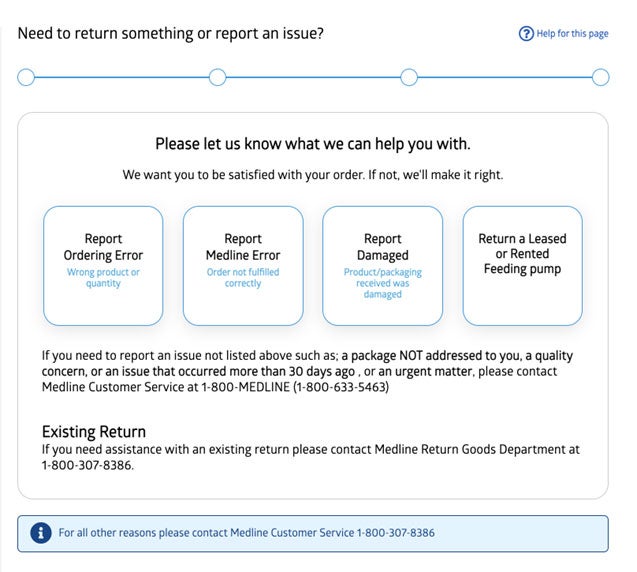
Select from available options

Select invoice to create return from
- Search criteria defaults to last 30 days for the account user was active in
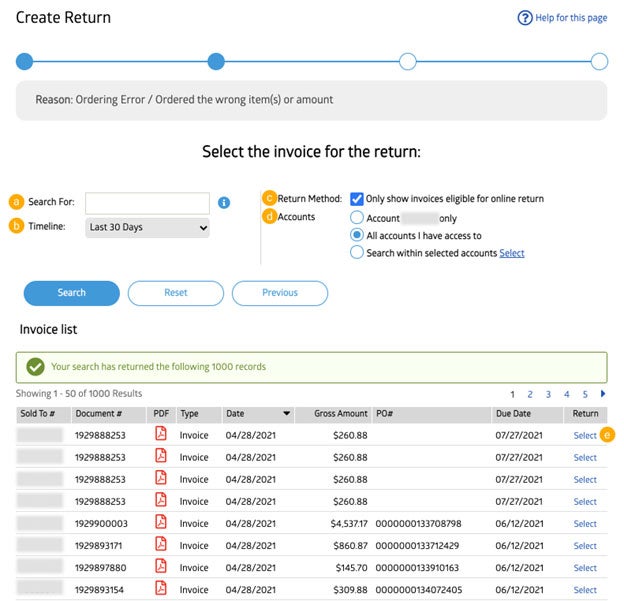

a. Search a specific order number, purchase order, etc. Hover over the blue “(i)” to get a list of specific items that are searchable.
b. Choose a timeline from the dropdown, or click “Select Date Range” to create a custom timeline for your search.
c. Using this feature allows users to search only invoices that are eligible for a return to be created, check the box to turn this feature on.
d. If multiple locations are available to you, you may click on the blue Select option in the “Search with in selected accounts” which will allow you to choose as many accounts as you wish to pull data for.
e. Once the results appear, you may click “Select” in the far right column to begin the process to create a return.
- Only eligible items/quantities are allowed to be selected
- Ineligible items will show in-line messaging
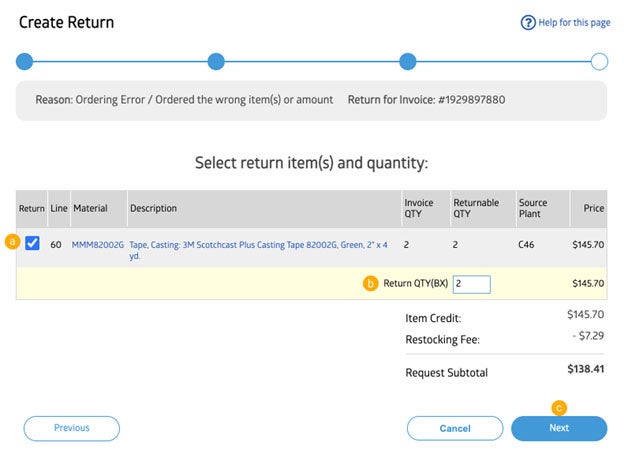
a. Check the box to the left of the item(s) to be returned.
b. Change “Returnable QTY” if full available QTY is not being returned.
c. Click “Next”.
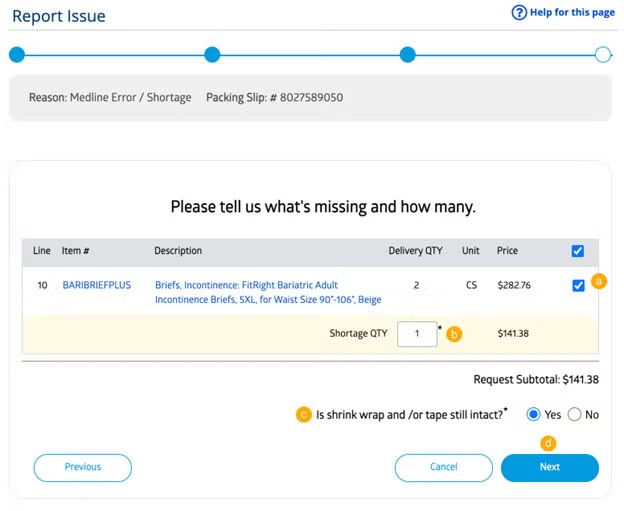
For Medline Error return, answer any additional questions regarding packaging that might appear under the requested subtotal and or provide wrong or excess item information.

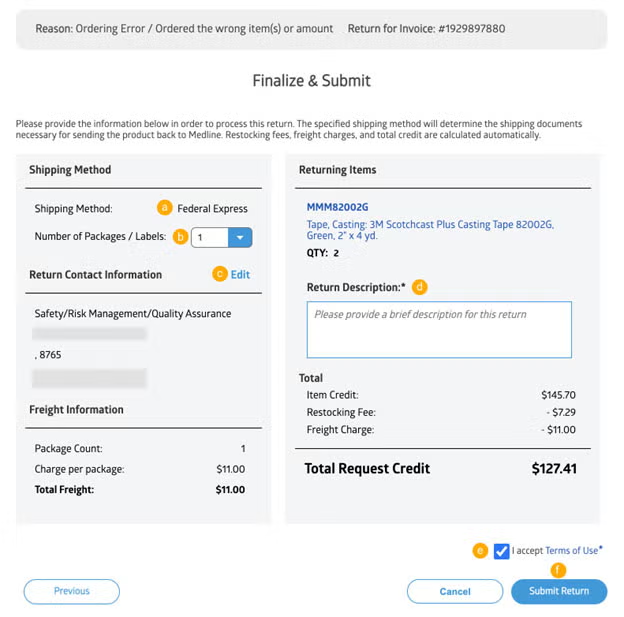
a. If available, select shipping method (FedEx or MedTrans).
b. Select # of packages (# of labels needed).
c. Edit return-specific contact information if necessary.
d. Enter brief description of return.
e. Accept Terms of Use.
f. Submit return.

For Medline Error return, review that all the information for your return is correct and hit submit
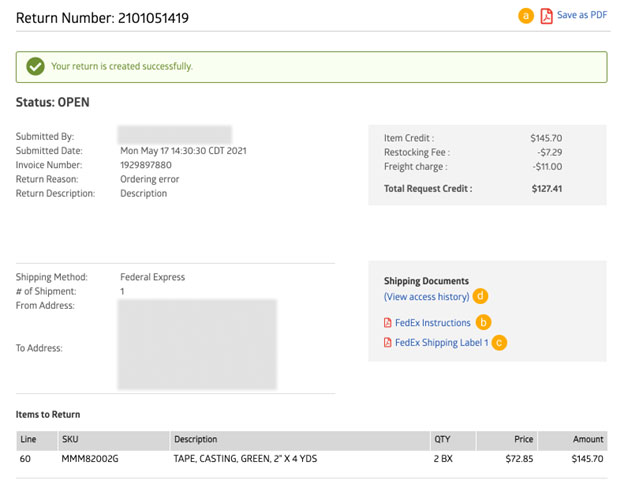
a. Save details as PDF if copy needs to be printed, saved, or e-mailed somewhere.
b. For ordering error, select # of packages (# of labels needed).
c. For ordering error, edit return-specific contact information if necessary.
d. For ordering error, enter brief description of return.
e. For ordering error, accept Terms of Use.