Search Tools
Need a way to search past item history, current backordered items or search for invoices? Take your item history and create a Shopping List with your most frequently ordered items or search past orders for tracking information or copies of packing slips. Medline.com offers multiple search tools at your fingertips that allow users to view different information in one place.
1. Search Orders
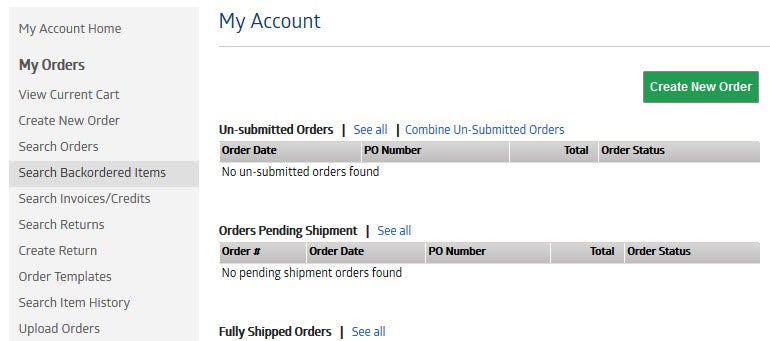
Once you have logged in, you have now arrived at the My Account landing page.

- Searching your orders provides you with a comprehensive listing of orders placed within the selected time period. This is a great starting point for reviewing order status, tracking, and quick re-orders.

- Select order status
- Select order channel
- If many locations are available to you, you may click on the Select option in the “Search with in selected accounts” which will allow you to choose as many accounts as you wish to pull data for.
- (optional) Enter search keywords. For a reminder of keywords available to be searched, you can hover your mouse over the gray “?” box
- Select timeline from dropdown.
2. Search Invoices and Credits
Once you have logged in, you have now arrived at the My Account landing page.

From here, select “Search Invoices/Credits”
- This search will provide you with on-demand PDFs of the document you are requesting, for your convenience. Once you select the document in question, you may print it or save it to your computer.
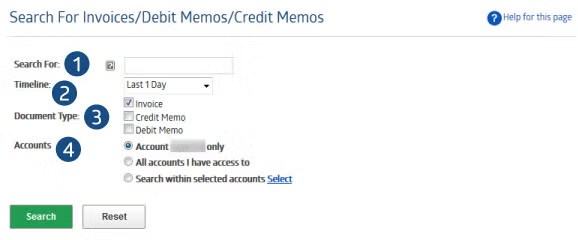
- (optional) Enter search keywords. For a reminder of keywords available to be searched, you can hover your mouse over the gray “?” box
- Select a Return Status of All, Open, or Received
- Choose a timeline from the dropdown, or click “Select Date Range” to create a custom timeline for your search
- If many locations are available to you, you may click on the blue Select option in the “Search with in selected accounts” which will allow you to choose as many accounts as you wish to pull data for
Once you have entered the criteria you are interested in, click the green “Search” button to perform the search
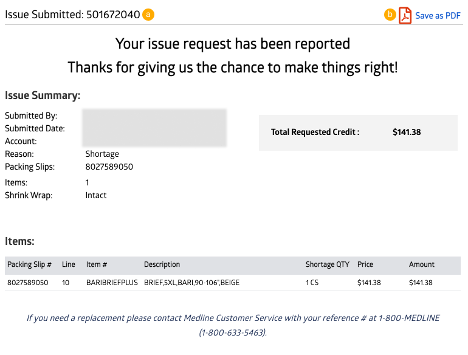
NOTE: Some of the data retrieved has been hidden for privacy purposes. You will receive all of these fields to completeness when performing your own search.Your results will display for the selected criteria. From here, you can click “View” on a return line to review that return in greater detail.
Your results will display for the selected criteria. From here, you can click on a document number to view a PDF of the Invoice, Debit Memo, and/or Credit Memo that you searched for.
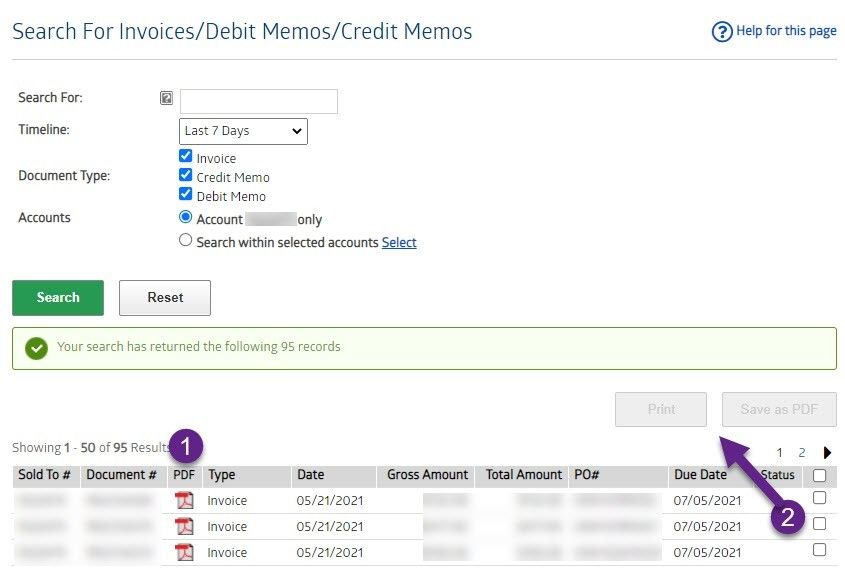
- Your results will display for the selected criteria. From here, you can click on the PDF icon to view a PDF of the Invoice, Credit Memo, and/or Debit Memo that you searched for.
- Users may also select the checkboxes on the right hand side to Print multiple invoices at one time. Or users may also Save multiple invoices as 1 attachment for easy sending via email as an example.
Note: Some of the data retrieved has been hidden for privacy purposes. You will receive all of these fields to completeness when performing your own search.
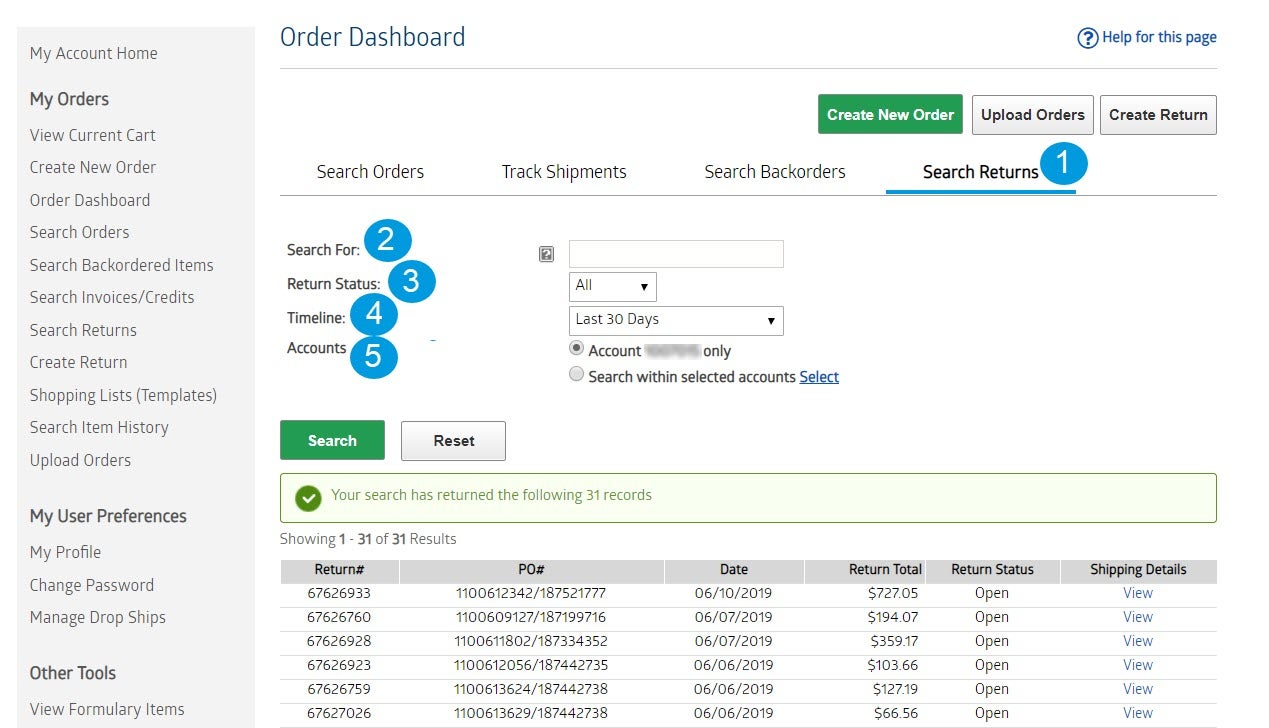
3. Search Returns
*NOTE: Some of the data displayed has been hidden for privacy purposes. You will receive all of these fields when performing your own search and return creation.
Once you have logged in, you have now arrived at the My Account landing page. From here, select Search Returns:
- Select “Search Return” from left nav
- There is a secondary way to Search returns and that is through “Order Dashboard” link
Searching returns provides you with a listing of all returns created during the selected timeline; returns along all steps of the process can be displayed.
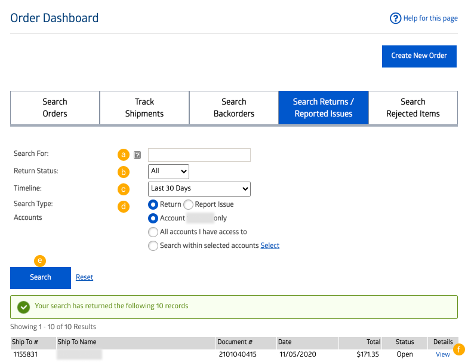
a. (Optional) Enter search keywords. For a reminder of keywords available to be searched, you can hover your mouse over the black/white”(i)” icon.
b. Select a Return Status of All, Open, or Received.
c. Choose a timeline from the dropdown, or click “Select Date Range” to create a custom timeline for your search.
d. If many locations are available to you, you may click on the blue Select option in the “Search with in selected accounts” which will allow you to choose as many accounts as you wish to pull data for.
e. Once you have entered the criteria you are interested in, click the green “Search” button to perform the search.
f. Some of the data retrieved has been hidden for privacy purposes. You will receive all of these fields to completeness when performing your own search.Your results will display for the selected criteria. From here, you can click “View” on a return line to review that return in greater detail.
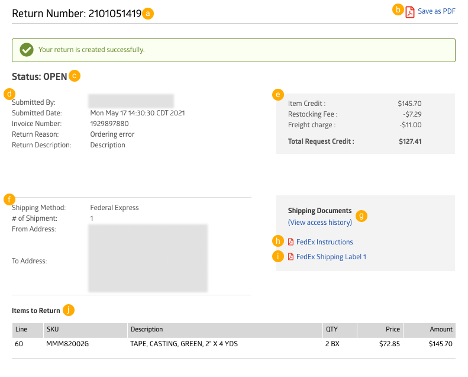
a. Return Number (RGA) for reference if speaking with Customer Service.
b. Save details as PDF if copy needs to be printed, saved, or e-mailed somewhere.
c. Current status of return.
d. Submission details.
e. Item credit / shipping / restocking fee details.
f. Shipping details.
g. Shipping document access history log.
h. Shipping instructions (FedEx or MedTrans).
i. Shipping label if FedEx.
j. Return item list.
a. Return Number (RGA) for reference if speaking with Customer Service.
b. Save details as PDF if copy needs to be printed, saved, or e-mailed somewhere.
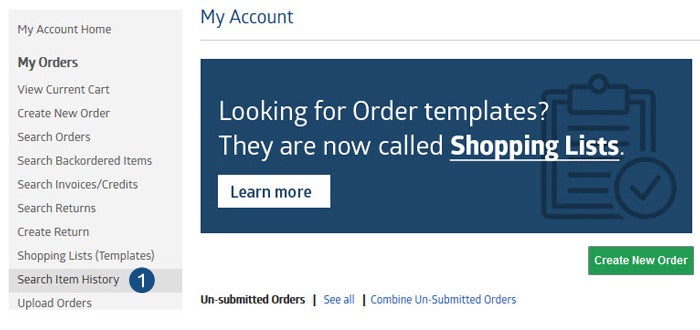
4. Search Item History
Once you have logged in, you have now arrived at the My Account landing page.
- Searching your item history provides you with a comprehensive listing of items ordered within the selected critera. This is a great starting point for creating templates, re-ordering items, and reviewing your total item spend during a specified time period.
Your results will display for the selected criteria. From here, you can assess item usage, total quantity ordered, total value, etc.

- (optional) Enter search keyword. For a reminder of which keywords are available to search, hover your mouse over the gray “?” box. If left blank, search will perform ALL items purchased within selected Timeline.
- Choose a timeline from the dropdown, or click “Select Date Range” to create a custom timeline for your search.
- To execute a search for multiple locations, you can choose either the “All Accounts” option, or you may click on the blue “Select” option which allows you to choose as many accounts as you wish to pull data for.
- This option allows users to eliminate items purchased only once during the chosen timeline. If you wish to return all items purchased, uncheck this option.
Once you have entered the criteria you are interested in, click the green “Search” button to perform the search
NOTE: Some of the data retrieved has been hidden for privacy purposes. You will receive all of these fields to completeness when performing your own search.Your results will display for the selected criteria. From here, you can click “View” on a return line to review that return in greater detail.
This screen will display the Return Number, as well as the From Address and To Address. For a PDF of the actual returns document, you can also click the “View Your Return” button in green. That PDF will display complete details, and can be printed or saved to your computer.

- To quickly add these items to a new order or a Shopping List, enter a quantity in the quantity field, or select the radial button all the way to the right of the line item. The “Add to Order” and “Add to Shopping List” buttons will then turn green for your selection.
- Another option to add items to a Shopping List is using the radial button next to the Total Amount to choose all items per page, if your results are more than the page shows, you may choose to use the Select All(B) option which will select all results returned.
NOTE: Some of the data retrieved has been hidden for privacy purposes. You will receive all of these fields to completeness when performing your own search.Some of the data retrieved has been hidden for privacy purposes. You will receive all of these fields to completeness when performing your own search.
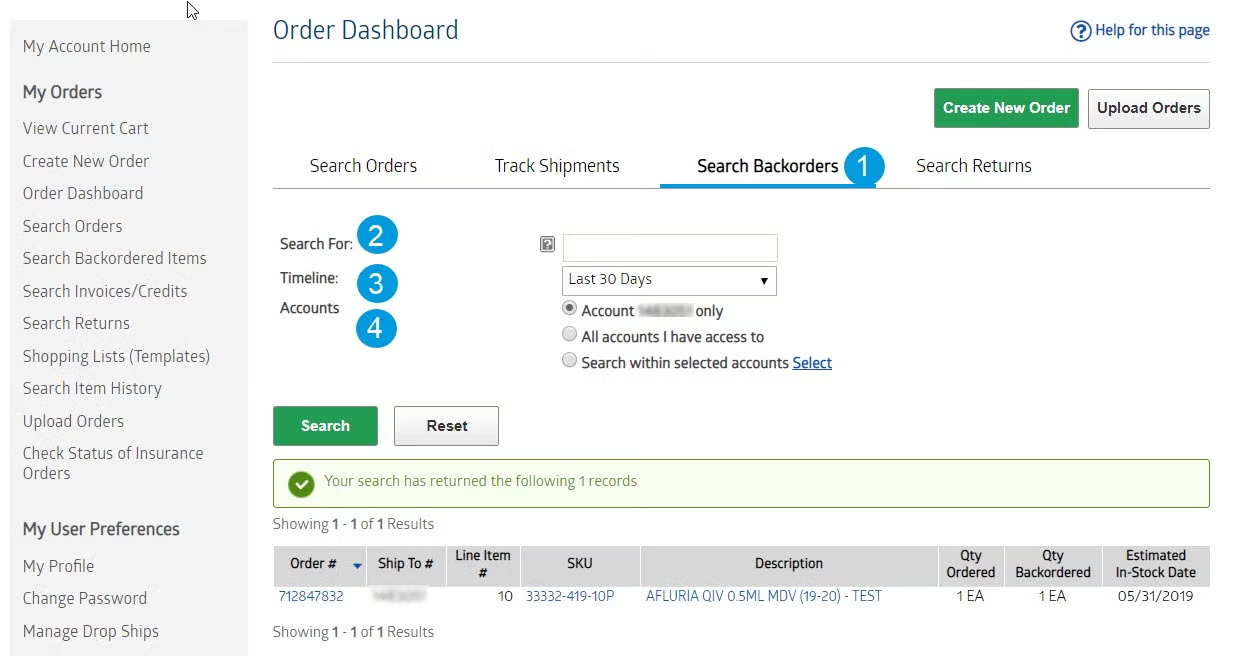
5. Search Backordered Items
Once you have logged in, you have now arrived at the My Account landing page. From here, select Search Backordered Items
Your results will display for the selected criteria. From here, you can assess item usage, total quantity ordered, total value, etc.
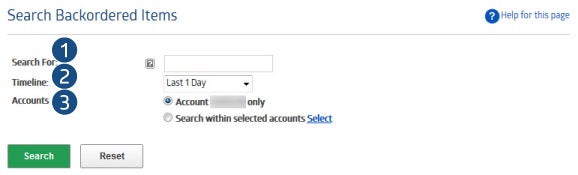
- (optional) Enter search keyword. For a reminder of which keywords are available to search, hover your mouse over the gray “?” box
- Choose a timeline from the dropdown, or click “Select Date Range” to create a custom timeline for your search
- If many locations are available to you, you may click on the blue Select option in the “Search with in selected accounts” which will allow you to choose as many accounts as you wish to pull data for
Once you have entered the criteria you are interested in, click the green “Search” button to perform the search
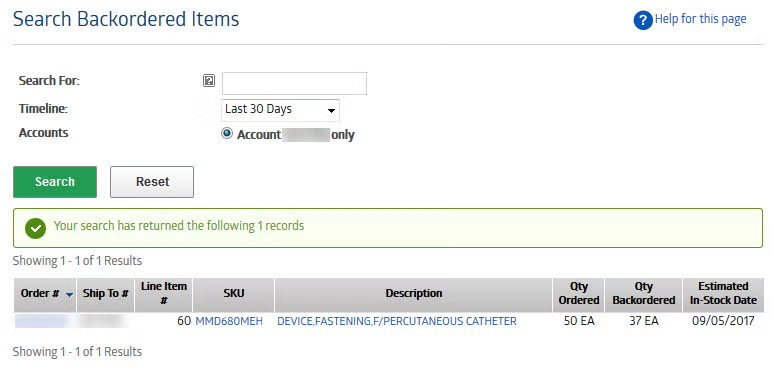
*NOTE: Some of the data retrieved has been hidden for privacy purposes. You will receive all of these fields to completeness when performing your own search.Your results will display for the selected criteria. From here, you can click “View” on a return line to review that return in greater detail.
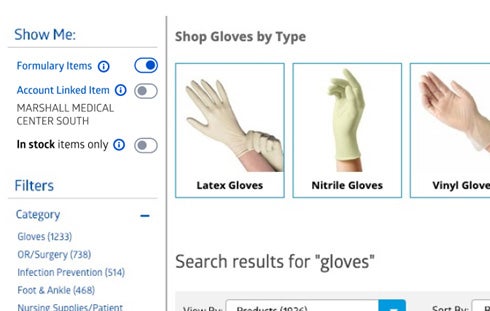
6. Product Search Features
Check out our newest search features designed to make your experience finding products faster, smarter, and more user friendly.
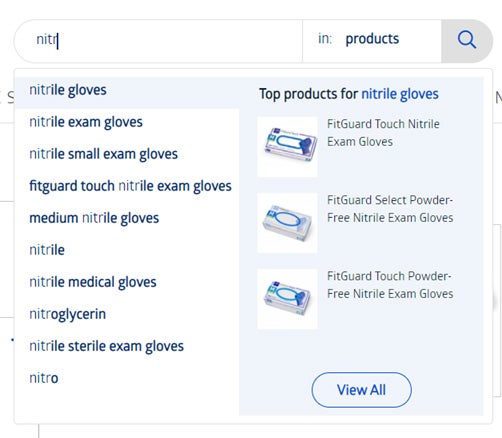
Start your search by typing a keyword or phrase into the search bar. You can search through our categories: products, comparable items and content & documents.
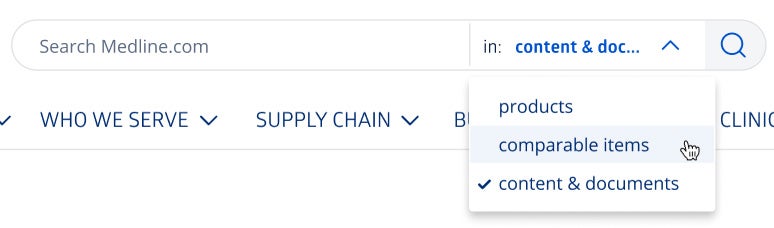
After you enter a few characters, the system anticipates the keyword or phrase based on popular searches and suggests the terms and products in a list.
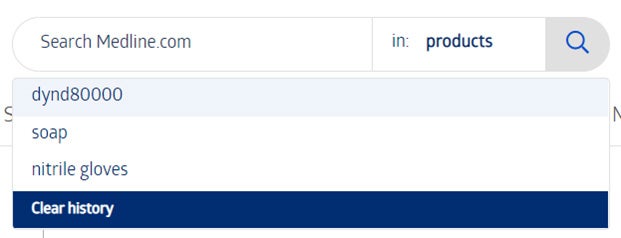
When your mouse is in the search box, before you type anything, the system shows your last searches.
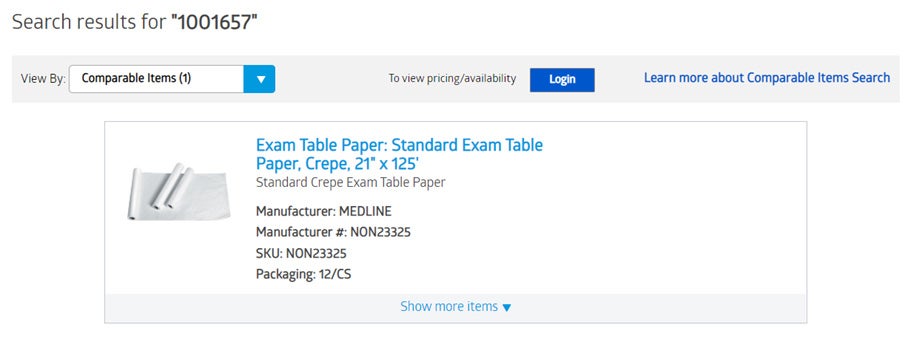
The comparable item search allows you to search by non-Medline branded part numbers and find equivalent Medline products in your search results.
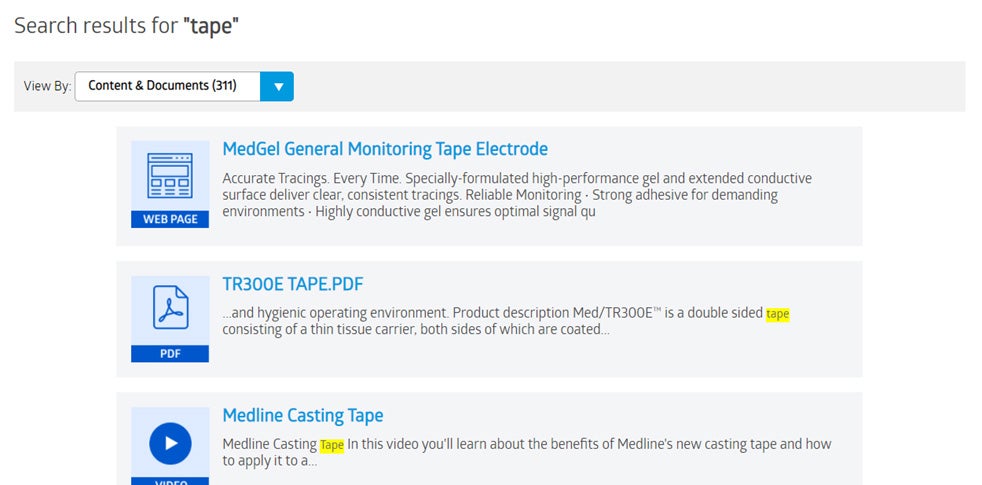
Allows you to view web content pages and other documents, separate from the catalog.
You can use a variety of filters to see items specific to your account.
The formulary items filter will narrow down your results to include only items on your formulary.
The account linked item filter will display items specifically linked to your account or that have been purchased in the past.
NEW In Stock Filter: You can now filter your results to see only items that are in stock so you can select items you know will be available.
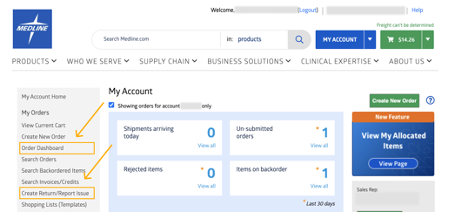
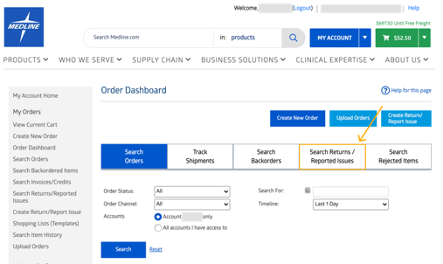
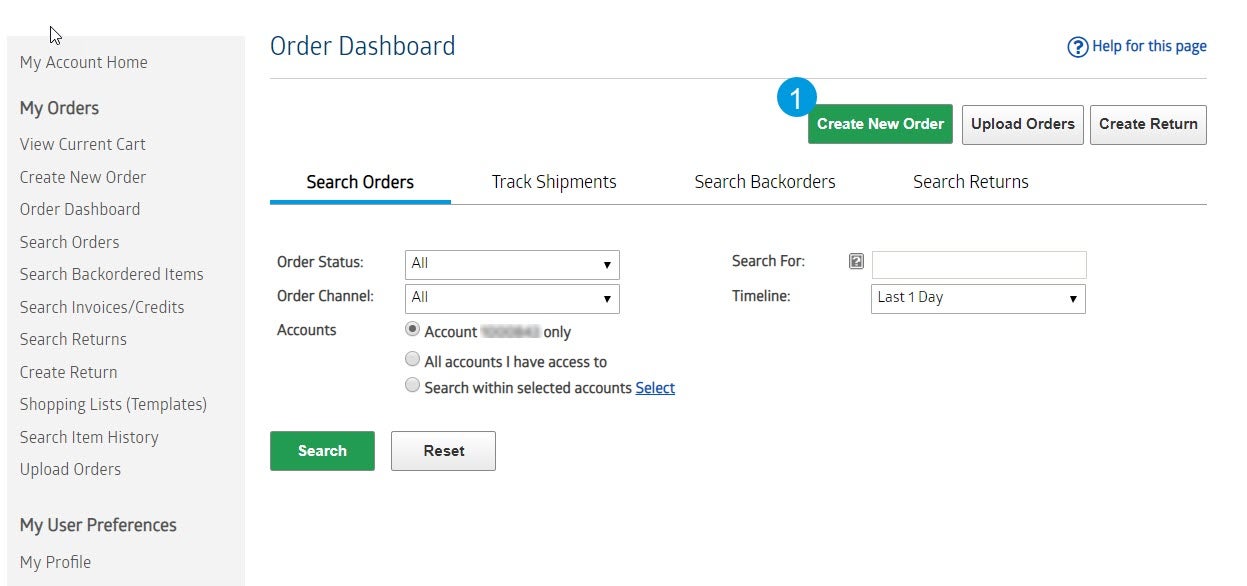
7. Order Dashboard
Once you have logged in, you have now arrived at the My Account landing page.
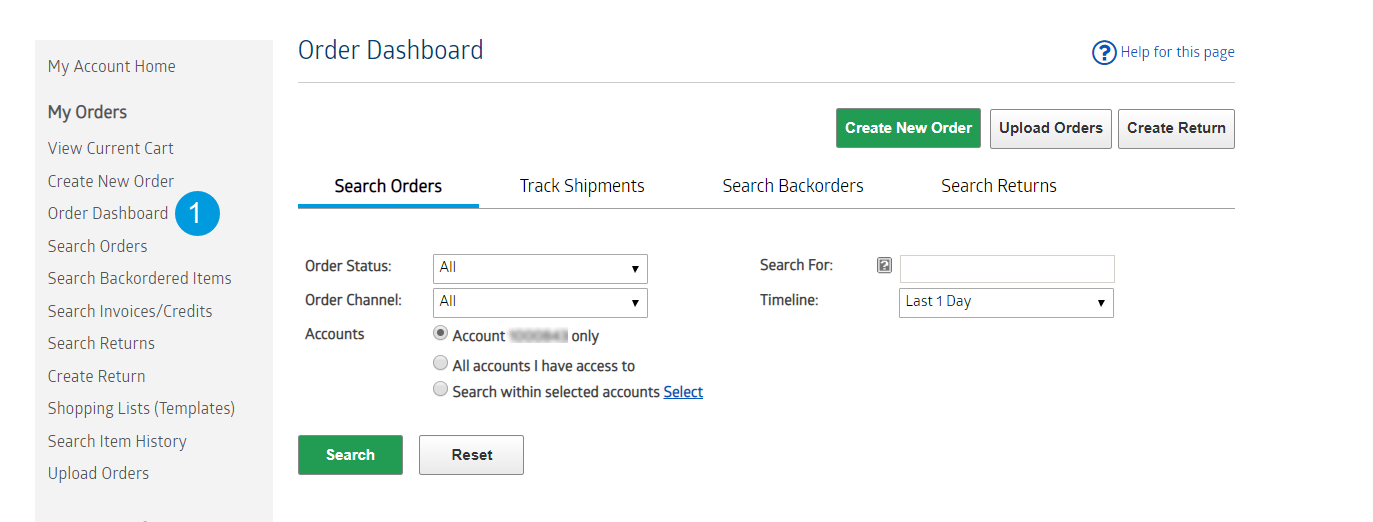
- The order dashboard provides you a comprehensive overview of multiple tools related to your order in one location.
Searching your orders provides you with a comprehensive listing of orders placed within the selected time period. This is a great starting point for reviewing order status and quick re-orders.
- Select Search Orders
- Select Order Status
- Select Order Channel
- If many locations are available to you, you may click on the Select option in the “Search with in selected accounts” which will allow you to choose as many accounts as you wish to pull data for.
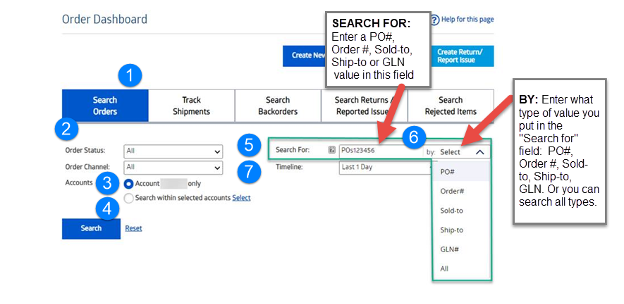
- Enter a PO number, order number, sold-to, ship-to or GLN value.
- Select the type you put in the “Search For” field from dropdown: PO number, order number, sold-to, ship-to or GLN. Using the “by” field allows the search to run faster and deliver results based on the value you entered.
- Select timeline from dropdown
The track shipment page gives you a comprehensive view of order shipments. The page will default to display the past 7 days of shipments, displaying the recently shipped items first.
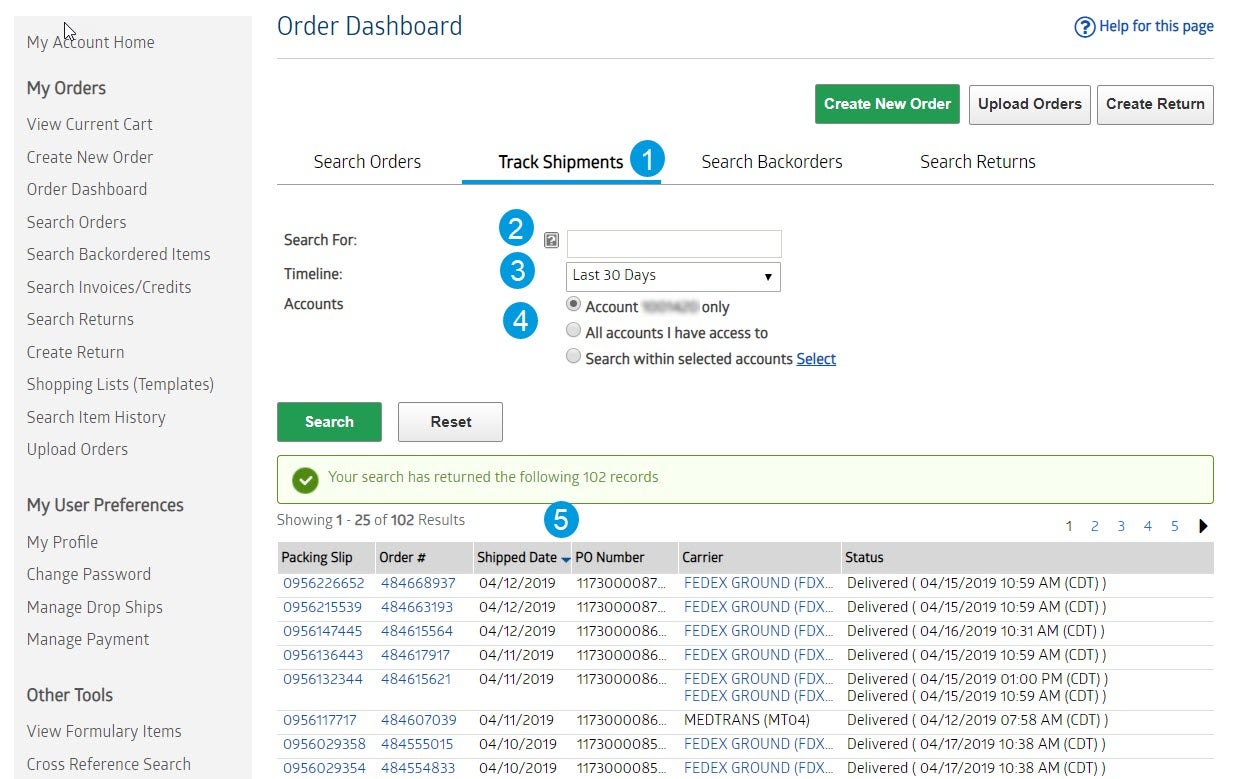
- Select Track Shipments
- (optional) Open Search Field. For a reminder of keywords available to be searched, you can hover your mouse over the gray “?” box
- Select timeline from dropdown.
- If many locations are available to you, you may click on the Select option in the “Search with in selected accounts” which will allow you to choose as many accounts as you wish to pull data for.
- Shipped Date can be sorted in ascending and descending order.
- Select Search Backorders
- (optional) Enter search keyword. For a reminder of which keywords are available to search, hover your mouse over the gray “?” box
- Choose a timeline from the dropdown, or click “Select Date Range” to create a custom timeline for your search
- If many locations are available to you, you may click on the blue Select option in the “Search with in selected accounts” which will allow you to choose as many accounts as you wish to pull data for
Once you have entered the criteria you are interested in, click the green “Search” button to perform the search
*NOTE: Some of the data retrieved has been hidden for privacy purposes. You will receive all of these fields to completeness when performing your own search. Your results will display for the selected criteria. From here, you can click “View” on a return line to review that return in greater detail.
Searching returns provides you with a listing of all returns created during the selected timeline; returns along all steps of the process can be displayed.
- Select Search Returns
- (optional) Enter search keywords. For a reminder of keywords available to be searched, you can hover your mouse over the gray “?” box
- Select a Return Status of All, Open, or Received
- Choose a timeline from the dropdown, or click “Select Date Range” to create a custom timeline for your search
- If many locations are available to you, you may click on the blue Select option in the “Search with in selected accounts” which will allow you to choose as many accounts as you wish to pull data for
Once you have entered the criteria you are interested in, click the green “Search” button to perform the search
NOTE: Some of the data retrieved has been hidden for privacy purposes. You will receive all of these fields to completeness when performing your own search. Your results will display for the selected criteria. From here, you can click “View” on a return line to review that return in greater detail.
- Click on Create New Order and you will be redirected to the shopping cart where you can begin to create your new order.
Shopping Cart
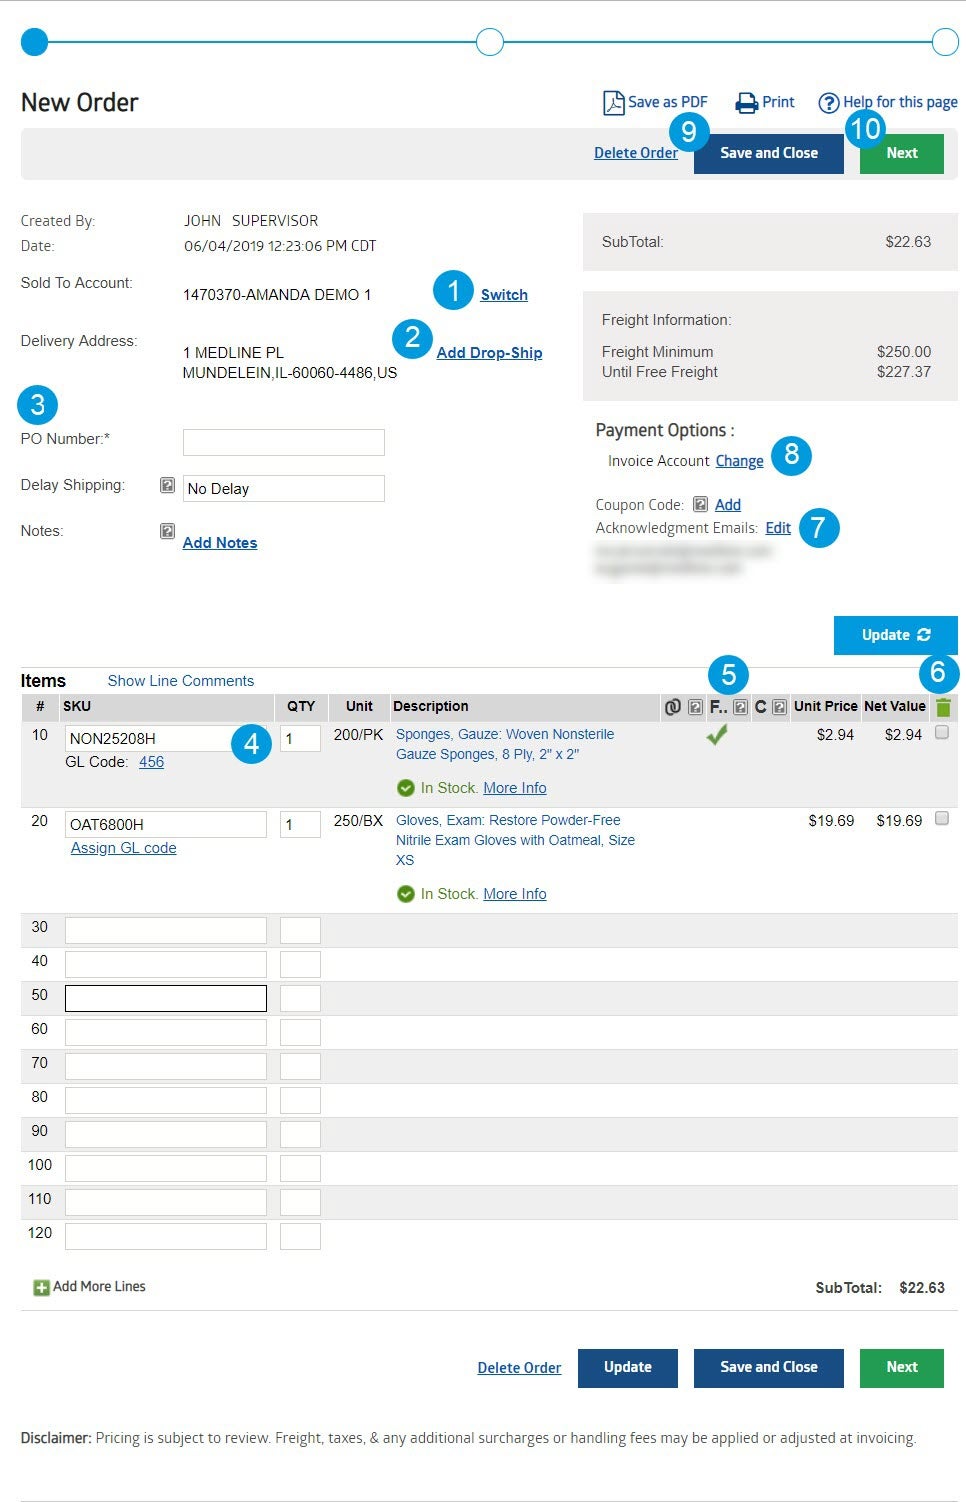
- Users that have access to purchase under multiple accounts may switch between accounts in their shopping cart. Customers may only place orders for 1 account, not multiple accounts on one order.
- Add a drop ship location to your order if applicable users.
- PO number is a required field when placing an order on Medline.com. If you do not have a PO number, you may use as an example the date and your initials.
- Change the quantities of your order before you submit to Medline, once you type in your new quantity, you may hit Enter or click on the Update button to update quantity and Net Value on the order.
- Quickly see which of your items are on contract and/or on your formulary in your shopping cart as well as seeing which items is Account Linked.
- Delete items from your cart using the trash can. First select the box to the right of the item(s) and then click on the trash can to delete that line from your order.
- You are able to add additional email addresses to receive the acknowledgement email that is sent when the order is placed.
- Choose between various payment options. Your payment options may be limited by your account settings – if you have any questions or concerns please speak with your Medline sales rep.
- Save and close lets you start an order but not submit to Medline, this order will show up under your Un-submitted Orders when clicked.
- Review and Submit will take you to the final screen for you to review your order, clicking on this does not submit your order to Medline just yet, this will take you to your final screen for review to which then you’d be able to submit your order.

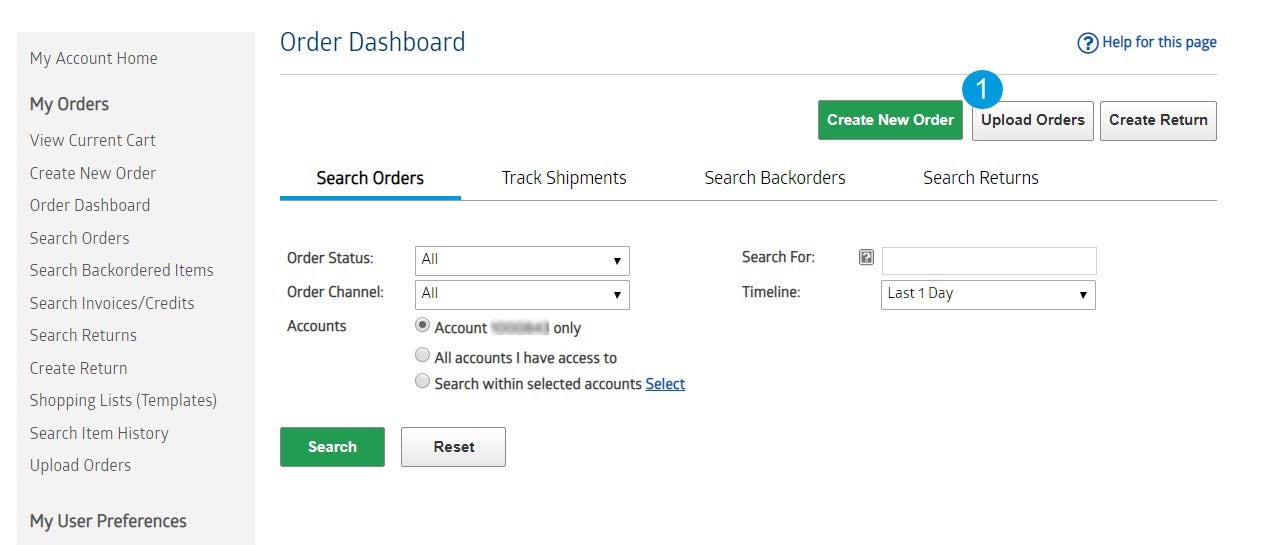
- Click on Upload Orders and you will be redirected to the Upload Orders page.
Before uploading an order file, you can choose to select the hyperlinked “Order Upload Format Guide” for detailed information on the file types and formatting required for the system to be able to recognize your order details. The guide covers Excel, text delimited, and VLX file format options.
3. Upload the Order
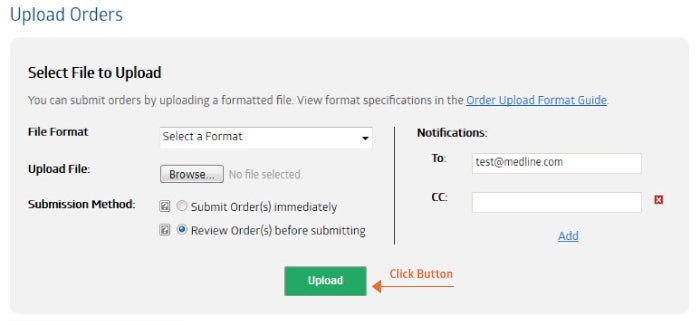
Once selections are made, click the green “Upload” button to complete the order upload process. If you chose to review the order(s) before submitting, you will go on to submit the order as though it was from a regular Medline.com shopping cart.
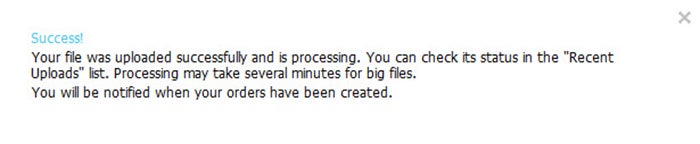
When your file has been successfully processed, you will see the attached message along with receiving an email of your upload status.
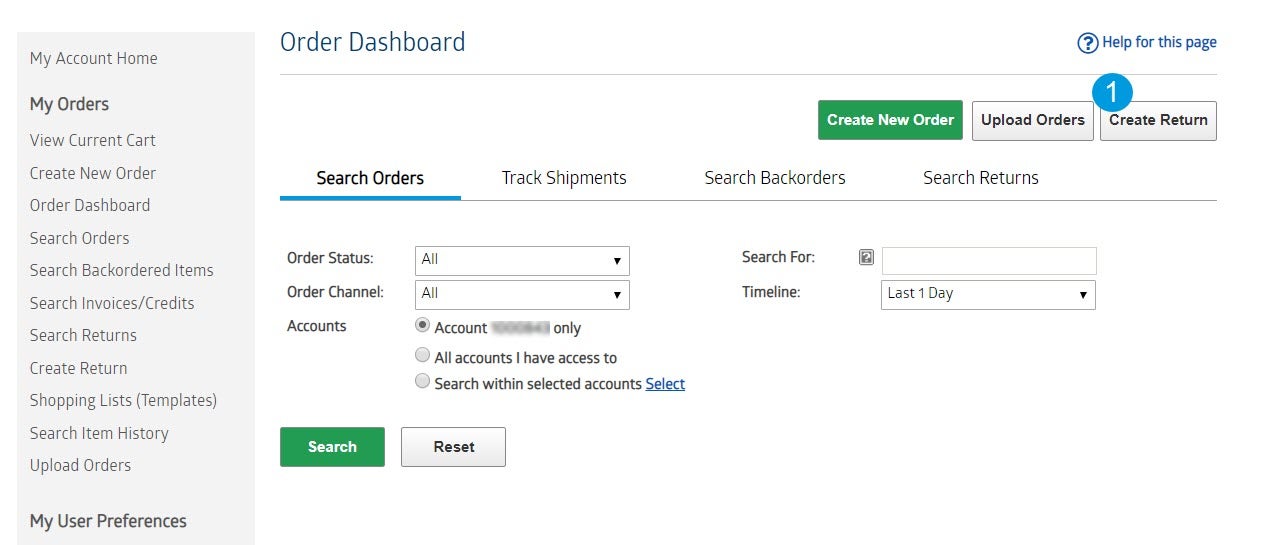
- Click on Create Returns and you will be redirected to the Create Returns page.
- Create Returns
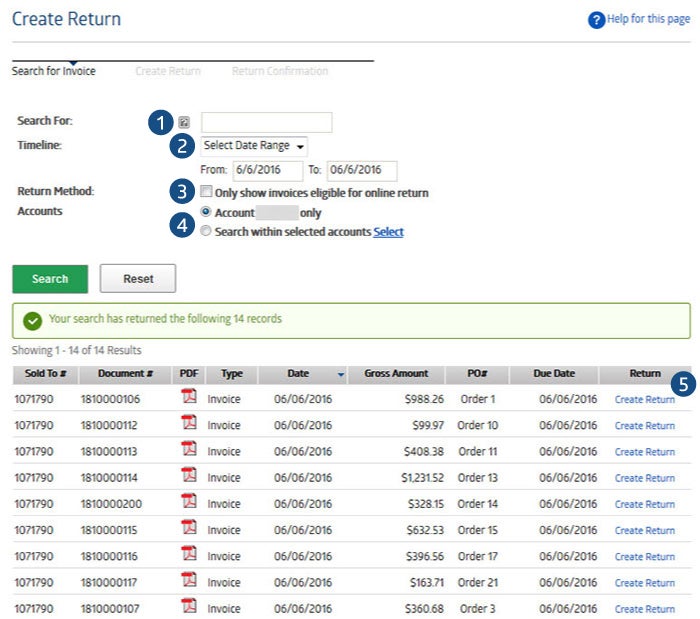
- Search a specific order number, purchase order, etc. Hover over the gray “?” to get a list of specific items that are searchable.
- Choose a timeline from the dropdown, or click “Select Date Range” to create a custom timeline for your search.
- Using this feature allows users to search only invoices that are eligible for a return to be created, check the box to turn this feature on.
- If multiple locations are available to you, you may click on the blue Select option in the “Search with in selected accounts” which will allow you to choose as many accounts as you wish to pull data for.
- Once the results appear, you may select “Create Return” in the far right column to begin the process to create a return.
3. Return Created

- Review details of your return by downloading a PDF document of the created return.
- View the FedEx instructions if using FedEx as the carrier to return the product.
- Download the shipping label(s) to attach to the packages being returned.